As the chilly winter days start to get a little warmer and the calendar turns to February, it is time to embrace the season of love. You don’t need to book an expensive appointment at a crowded salon to feel festive.
In fact, creating unique valentines nails art right in your own bedroom is one of the coziest ways to celebrate.
This guide is your ultimate source for simple, beautiful, and beginner-friendly nail ideas that anyone can do at home using household items. Whether you have short nails or long ones,
we have gathered more than 20 looks that are perfect for 2026. Grab your favorite polish and get ready to create stunning valentines nails art without leaving your house.
Why Doing Your Nails at Home is Best
There is something very relaxing about doing your own manicure. You can put on your favorite romantic movie, wear your comfiest pajamas, and take your time.
In 2026, the trend is all about being authentic and saving money. DIY manicures are huge right now because they allow you to be creative.
The best part about valentines nails art is that you don’t need fancy tools. You can use things you already have, like a sponge, tape, or even a plastic bag.
You don’t need to be a professional artist to make your hands look lovely. These designs are forgiving, quick, and fun.
It is a wonderful way to practice self-care and get into the holiday spirit while mastering your own valentines nails art.
Table of Contents
20+ Easy & Unique Valentines Nails Art Ideas
These ideas are completely fresh and designed for beginners. We are moving beyond simple dots and showing you cool tricks to make professional-looking valentines nails art with plenty of detail.
1. The “Saran Wrap” Marble
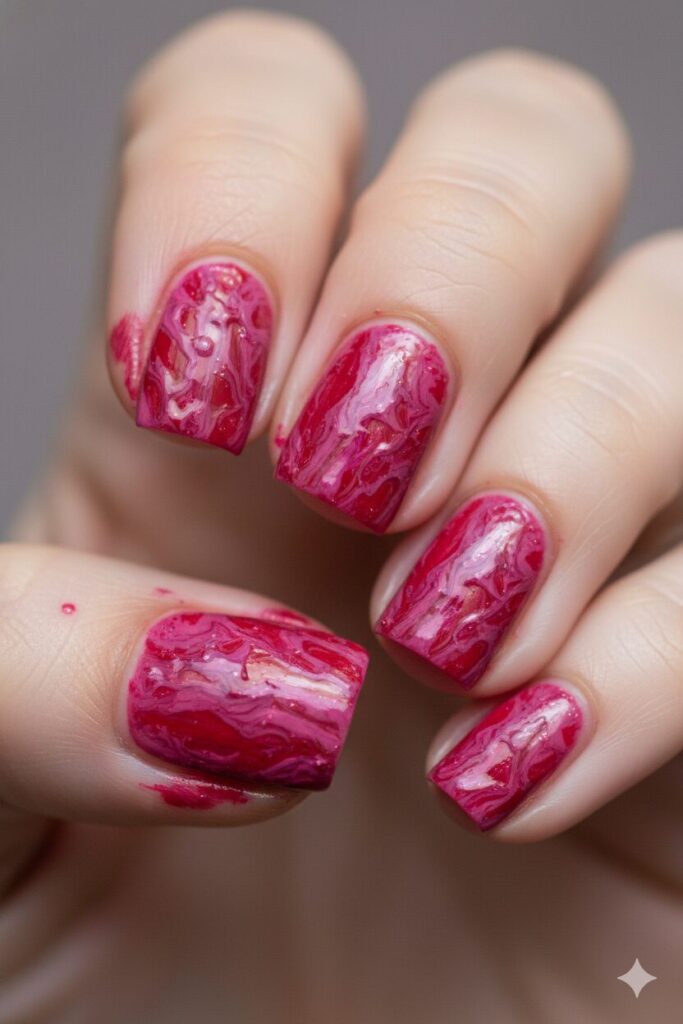
You can create a beautiful marble effect using everyday plastic food wrap (Saran wrap) from your kitchen. First, paint your nails a base color like white or light pink and let it dry completely.
Then, paint a coat of red polish on top. While the red is still wet, take a crumpled ball of plastic wrap and dab it gently all over the nail. Don’t press too hard; just tap it lightly.
This technique lifts some of the wet red polish, revealing the lighter pink underneath in a cool, organic pattern. It creates a textured look that resembles crushed velvet or expensive marble stone.
Because the plastic wrap crinkles randomly, no two nails will ever look exactly the same. It is a messy, artistic process that results in a very sophisticated form of valentines nails art. It takes seconds to do but looks like it took hours.
2. The “Paper Reinforcement” Half-Moon
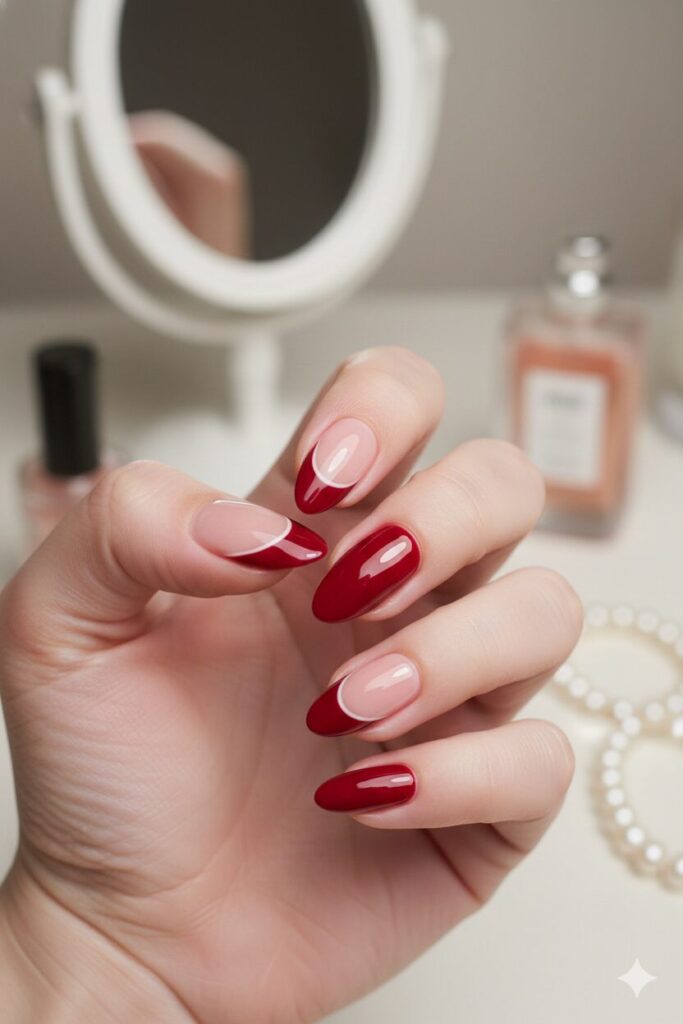
Do you know those little white ring stickers used to fix holes in notebook paper? They are the perfect stencil for a vintage look. Place one sticker at the very bottom of your nail,
covering the cuticle area. Make sure it is pressed down firmly so no paint can leak under it. Then, paint the rest of your nail red or pink.
Once the paint is tacky (not fully dry, but not wet), carefully peel off the sticker. You are left with a perfect, clean curve of “negative space” (your natural nail color) at the bottom.
This is called a “Half-Moon” manicure, and it was the height of fashion in the 1950s. It brings a retro, classy vibe to your look.
Using this simple office supply hack makes this valentines nails art incredibly precise and easy for anyone to achieve.
Content Related Post
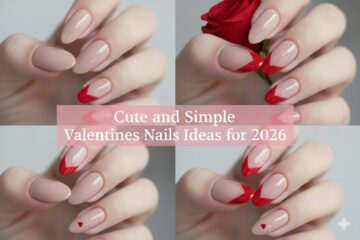
Cute and Simple Valentines Nails Ideas for 2026
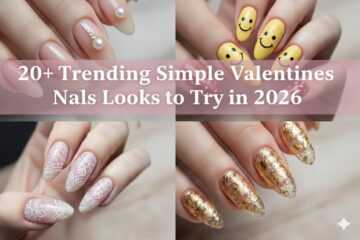
20+ Trending Simple Valentines Nails Looks to Try in 2026
Best Pink and Red Valentines Nails Designs for 2026
20+ Easy Valentines Nails Art You Can Do at Home 2026
3. The “Bobby Pin” Rose
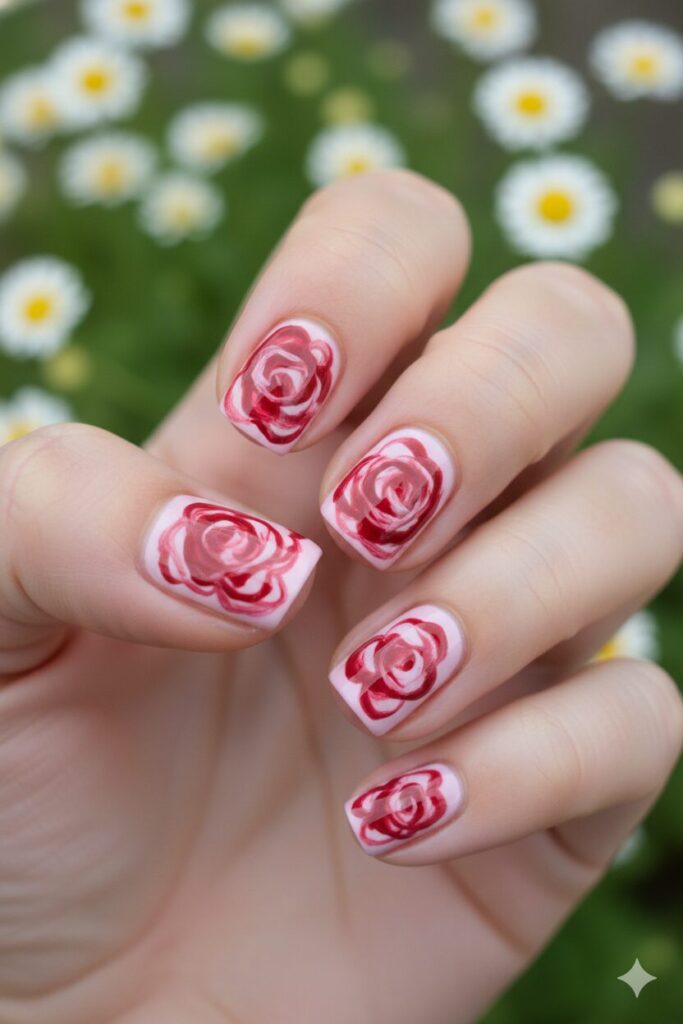
You do not need a tiny brush to paint a rose; you just need a bobby pin. Start by painting your nail a soft pink or white.
Dip the round end of a bobby pin into red polish and make two blobs that touch each other on your nail. They don’t need to be perfect circles.
Then, quickly dip a toothpick into a lighter pink or white polish and swirl it inside the wet red blobs. The swirling action mixes the colors to look like the folded petals of a rose.
It creates a romantic floral design that looks like an oil painting. You can add a tiny green dot for a leaf if you like. This creates elaborate-looking valentines nails art with zero drawing skills required.
4. The “Fan Brush” Striped Heart
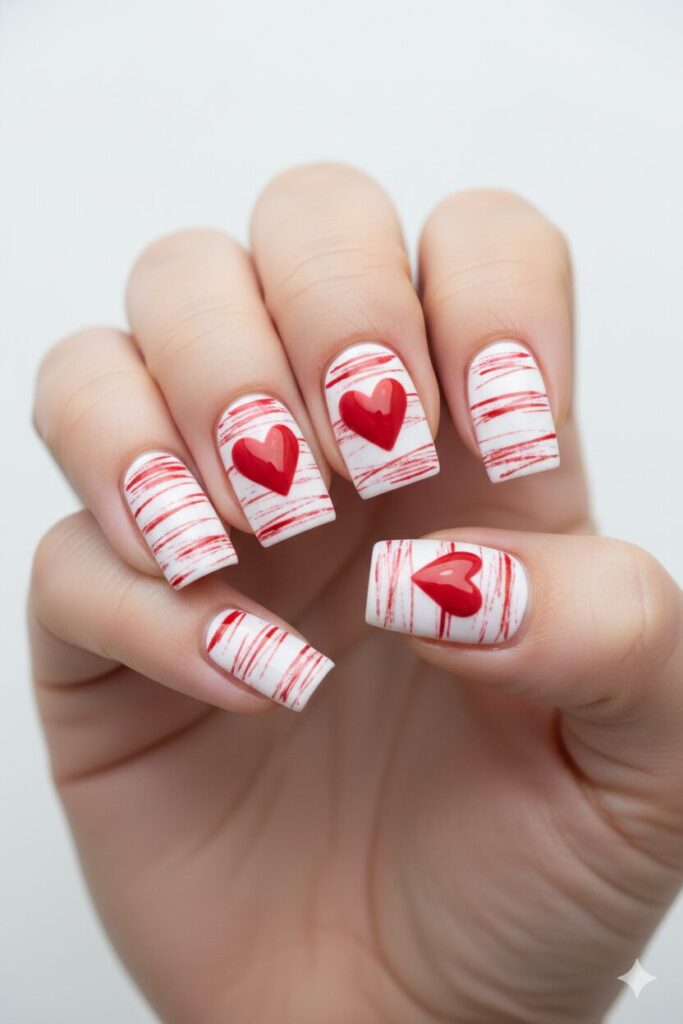
If you have an old makeup fan brush (or even a clean toothbrush), you can make cool textures. Paint your nail a solid white base.
Dip the very tips of the brush bristles lightly into red paint. Drag the brush horizontally across the nail from left to right.
This creates thin, scratchy, imperfect red lines over the white background. It looks like textured tweed fabric or modern abstract art.
Once that is dry, paint a solid, neat red heart right in the middle. The contrast between the messy, textured background and the clean, bold heart shape makes for very trendy valentines nails art. It adds depth and interest to a standard heart design.
5. The “Scotch Tape” Lightning Bolt
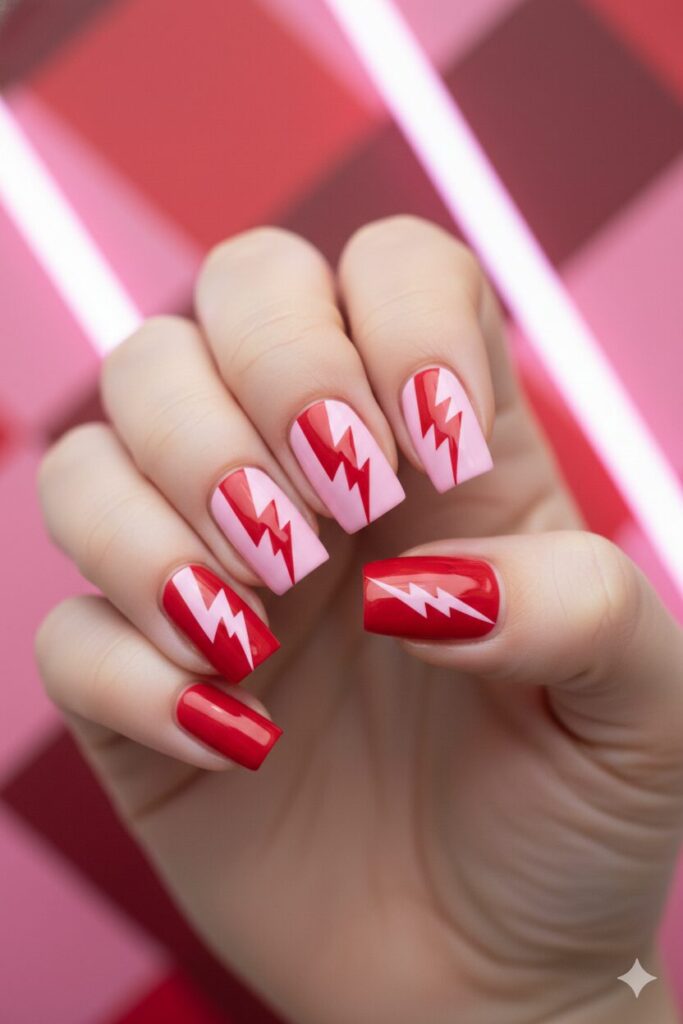
Cut a zigzag shape out of a piece of scotch tape using craft scissors. Stick the tape down the middle of your dried, painted nail (say, a pink base).
Paint a contrasting color (like red) over the entire nail. Wait a moment, then peel the tape off.
You will reveal the pink color underneath in a sharp, electric lightning bolt shape. This design is perfect for a “Love Struck” or “Electric Love” vibe. It is edgy, cool, and perfect for a non-traditional Valentine’s look.
This geometric valentines nails art looks sharp and professional because the tape does all the hard work of making straight lines for you.
6. The “Loofah” Fishnet Pattern
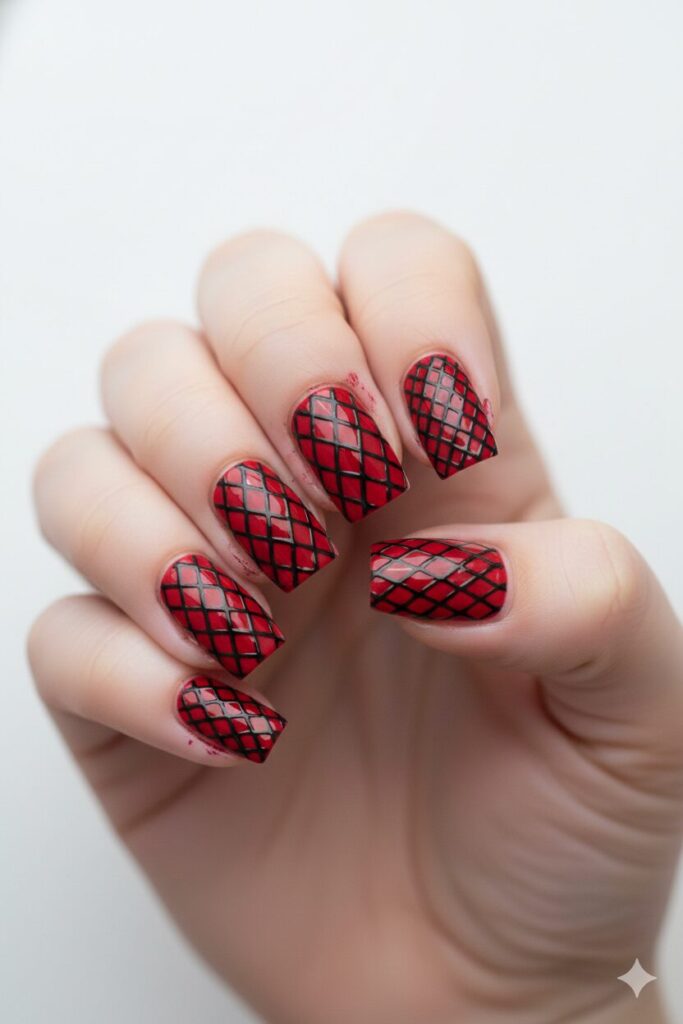
Take a piece of an old bath loofah or the mesh netting from a fruit bag. Paint your nails a bright red base and let them dry completely.
Hold the piece of net tightly over your nail so it doesn’t move. Sponge a black or dark red polish over the net. Lift the net straight up.
You will have a perfect diamond grid pattern left on your nail that looks exactly like fishnet stockings or lace. It is a sexy, textured, and mature design.
This is a brilliant DIY hack for valentines nails art that turns trash into treasure. It gives your nails a complex pattern instantly without drawing a single line.
7. The “Watercolor” Sharpie Hack
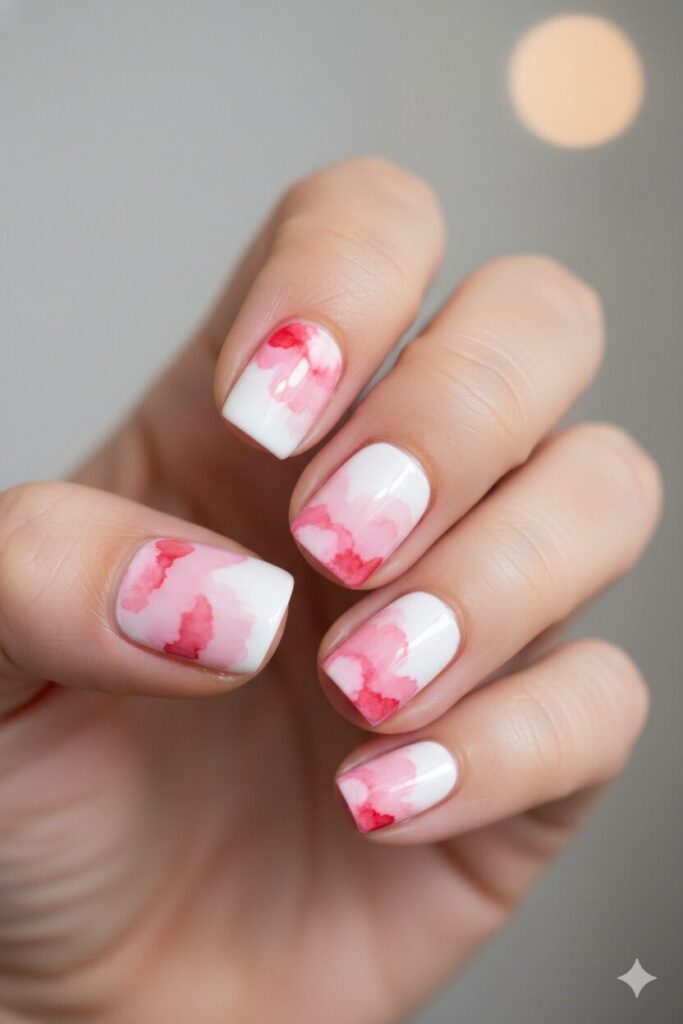
Paint your nails white or very light pink. Take a red and a pink Sharpie marker (permanent marker) and scribble randomly on the nail.
It will look messy at first. Then, dip a brush or Q-tip in rubbing alcohol and dab it gently on the ink marks.
The alcohol melts the ink and makes it spread out and blend like watercolor paint. It creates a soft, cloudy, dreamy effect with beautiful washes of color.
It looks like a sunset or a cloud of love. This artistic valentines nails art is fun because you get to play with colors like a kid, and the result is always soft and beautiful.
8. The “Sugar Spun” Texture

This technique is messy but creates an incredible 3D effect. Pour a glob of red polish onto a piece of paper and let it sit for about a minute until it gets thick and sticky.
Dip a toothpick into it and pull it up to create a string. Drag thin strings of sticky polish across your nail back and forth.
It looks like spun sugar, caramel, or cotton candy draped over your nail. It adds a raised texture that catches the light.
Do this over a pink base for a sweet, candy-like valentines nails art design. It looks delicious and intricate, resembling a fancy dessert decoration.
Read More Other Post
30+ Best Cute and Simple Spring Nails
Top 25+ Beautiful Blue Spring Nails
9. The “Newspaper” Love Letter
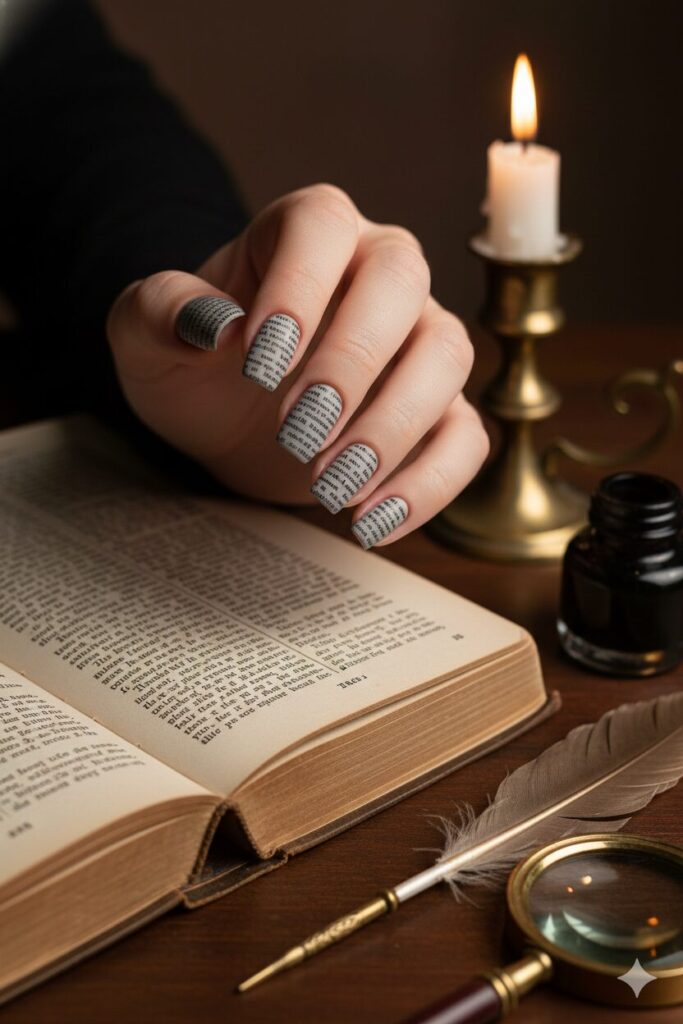
Paint your nails a light grey, white, or nude. Take a small piece of newspaper (with text on it) and dip it into rubbing alcohol. Press the wet paper firmly onto your nail for about 10-15 seconds. Carefully peel it off.
The ink from the newspaper transfers perfectly onto your nail! It looks like old newsprint or pages from a book. It fits the “Love Letter” or “Romance Novel” theme perfectly.
It is a vintage, academic aesthetic. This is one of the coolest valentines nails art tricks that creates a detailed print instantly without any drawing.
10. The “Gradient” Sponge Stamp
Paint stripes of red, pink, and white directly onto a small piece of makeup sponge. Press the sponge onto your nail and bounce it up and down slightly. Repeat this a few times to build up the color intensity.
Unlike a smooth ombre, doing this creates a tie-dye or sunset look where the colors blend softly into each other. It eliminates harsh lines.
It is the easiest way to wear multiple colors at once without them looking striped. This valentines nails art is bright, colorful, and very cheerful, perfect for a fun date.
11. The “Q-Tip” Clouds
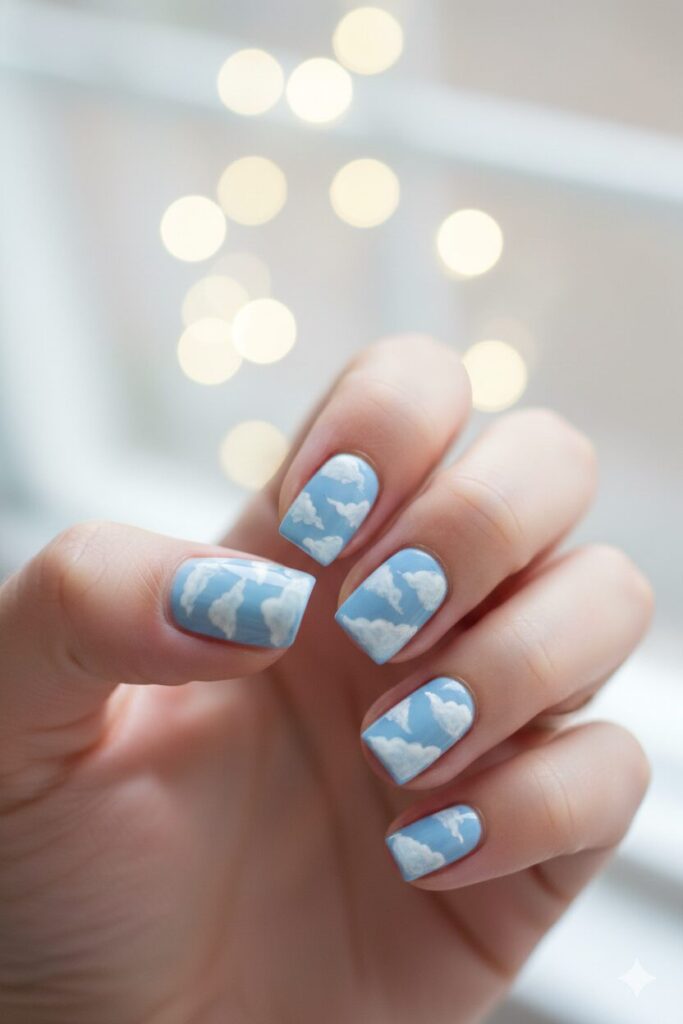
Pull the cotton off the end of a Q-tip so it is fluffy, loose, and not tight. Dip this fluffy cotton lightly into white polish. Dab it gently on a blue or pink nail background.
The fluffy texture of the cotton creates realistic, soft clouds with irregular edges. It is much better and more realistic than drawing circles with a tool.
It looks dreamy and ethereal. This valentines nails art represents “being on cloud nine” in love. It gives a soft, sky-like appearance to your manicure.
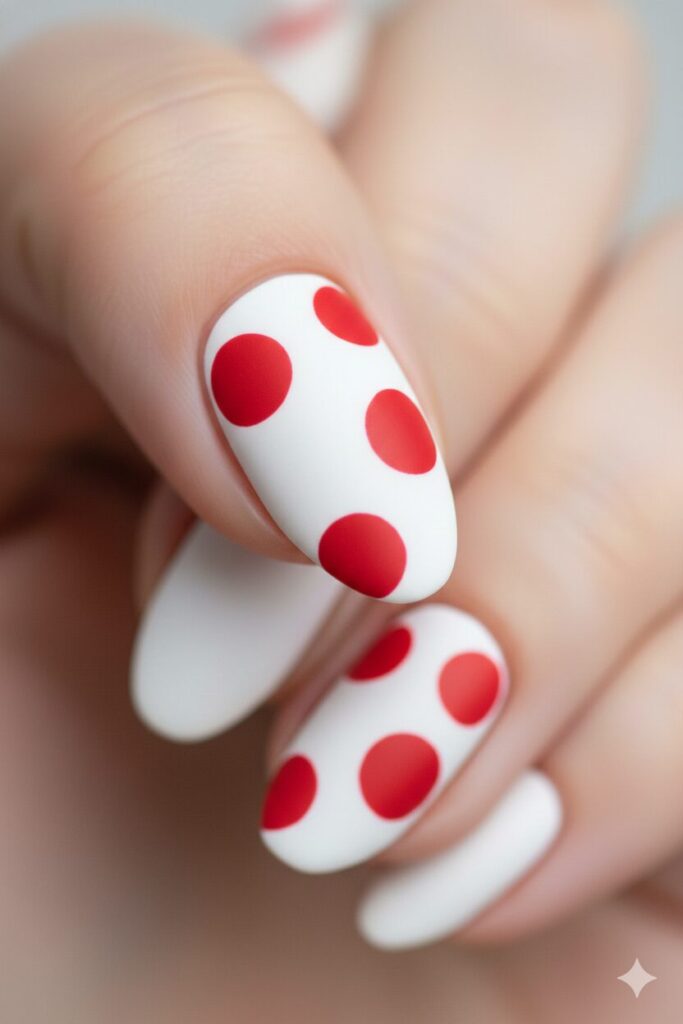
12. The “Hole Punch” Confetti

Use a regular office paper hole puncher on a piece of colored tape or a dried sheet of nail polish (paint a square on a plastic bag, let it dry, then peel it off). Punch holes in it to get perfect circles. Stick these circles onto your nail.
You can make a perfect polka dot pattern without trying to paint circles by hand, which can be difficult. The circles are crisp and even every time.
Using this office tool makes valentines nails art precise and neat. You can layer different colored circles for a confetti party look.
13. The “Striping Tape” Plaid
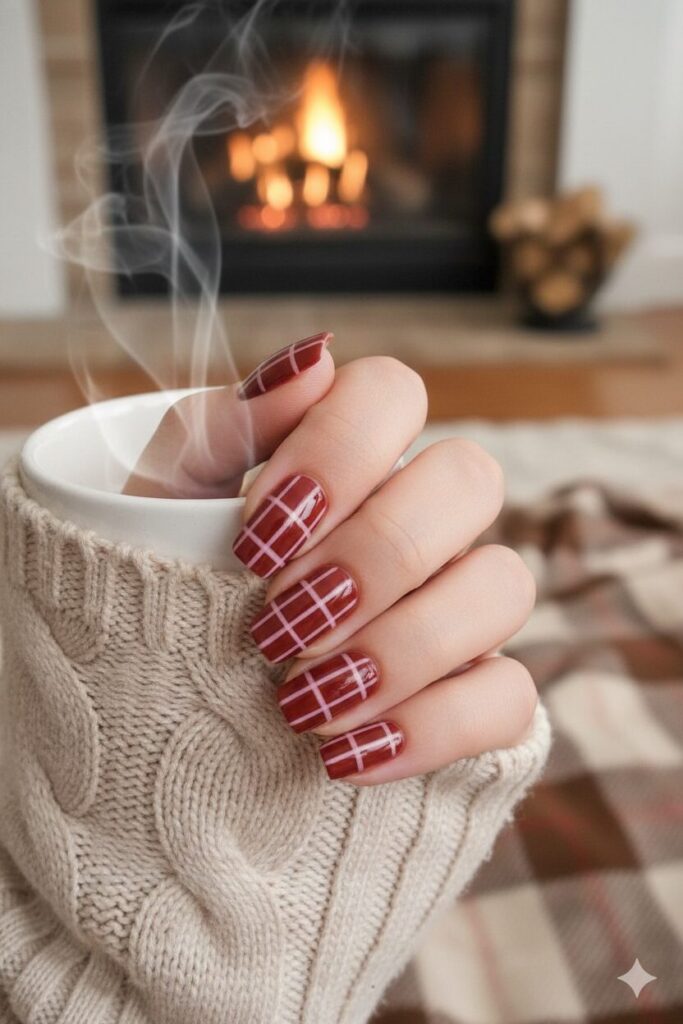
Buy a roll of thin metallic striping tape (it costs pennies online). Stick pieces of the tape in a crisscross grid pattern on a red nail. Paint a coat of pink polish over the tape. While the pink is wet, peel the tape off.
You reveal the red color underneath in perfect, razor-thin lines. It creates a plaid or tartan fabric look. It is cozy, warm, and very stylish.
This valentines nails art looks incredibly intricate and difficult, but the tape does all the hard work of keeping the lines straight for you.
14. The “Matte & Shine” Contrast
Paint your nails a solid deep red or black. Put a matte top coat over the entire nail to remove the shine. Then, use a glossy top coat (or clear polish) to draw a simple heart shape or paint just the tip of the nail.
The color remains the same, but the texture is different. The glossy heart shines brightly against the flat, dull matte background.
It is a subtle, sophisticated effect that people notice when the light hits it. This monochrome valentines nails art is chic, modern, and very high-fashion.
15. The “Eraser” Stamp
Use the small rubber eraser found on the end of a standard pencil. Dip the eraser into red or pink paint and stamp it firmly onto your nail.
It creates a perfect, larger circle than a dotting tool can make. You can arrange these large circles to look like balloons, flowers, or just a mod pattern.
It is a great tool for people who have shaky hands and can’t draw circles. This valentines nails art is bold, graphic, and very easy to execute.
16. The “Galaxy” Love
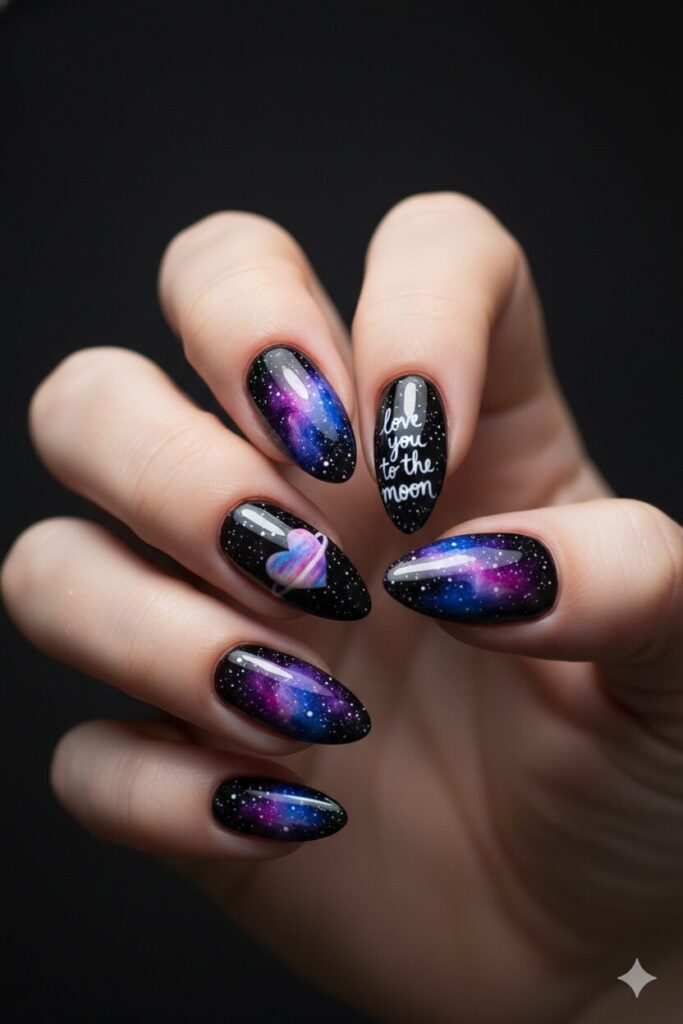
Paint your nail black. Sponge on tiny bits of dark blue, purple, and pink polish to create a nebula effect. Then, dip a toothbrush in white paint and flick it to create stars. Add a small heart shape as a “planet.”
It looks like deep space or the night sky. It symbolizes the saying “I love you to the moon and back.”
It is a dark, romantic alternative to the usual pink and red. This valentines nails art is magical, deep, and perfect for stargazers.
17. The “Gold Flake” Top Coat
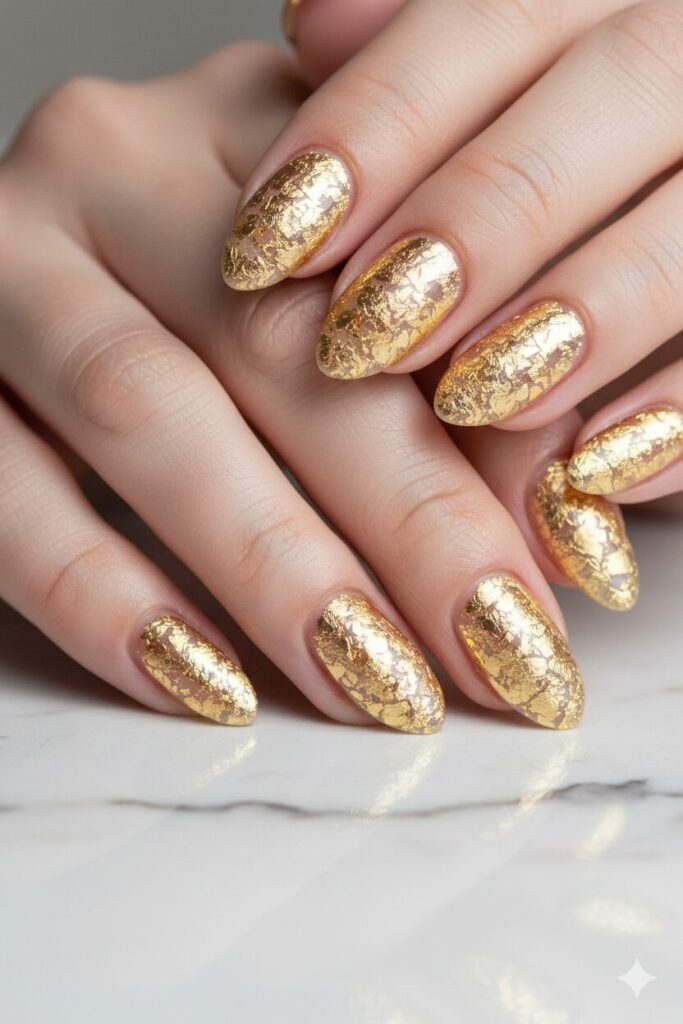
Make your own luxury glitter polish. Take a sheet of gold leaf (available at craft stores) and shred it into tiny pieces. Drop these pieces into a bottle of clear top coat and shake it up well.
Paint this over any color nail. The uneven gold chunks look expensive, organic, and artistic, unlike regular round glitter.
It adds a luxury, 24-karat finish to your manicure. This valentines nails art elevates any simple color into something that looks like jewelry.
18. The “Drip” Paint
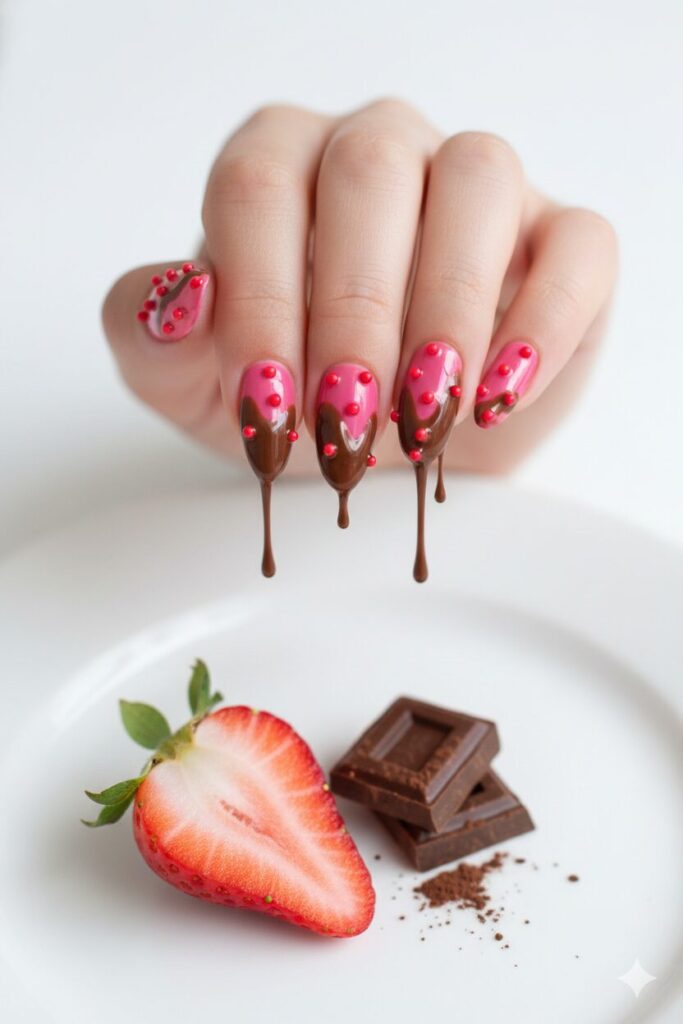
Put a large glob of thick polish near your cuticle. Use a toothpick to drag the paint down towards the tip in wavy lines to look like melting liquid. Round out the bottom of the drips.
Do brown drips on a pink nail for a “Chocolate Covered Strawberry” look, or red drips for a paint effect. It is playful, 3D, and looks delicious.
This valentines nails art is very trendy among younger crowds and looks great on Instagram.
19. The “Vertical” Split
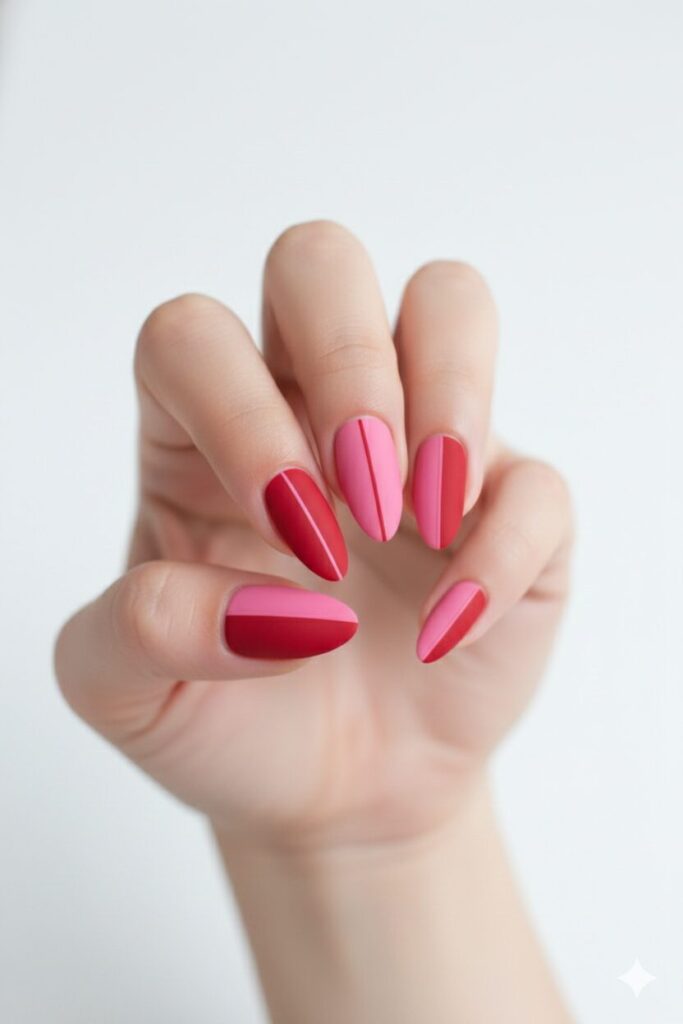
Put a piece of tape vertically down the exact center of your nail. Paint one side of the tape red and the other side pink. Peel the tape off to reveal a clean line.
This visual trick makes your finger look longer and slimmer. It is a color-block style that is very modern and minimalist.
It allows you to wear two colors without them blending. This geometric valentines nails art is clean, sharp, and suitable for a professional environment.
20. The “Thumbprint” Heart
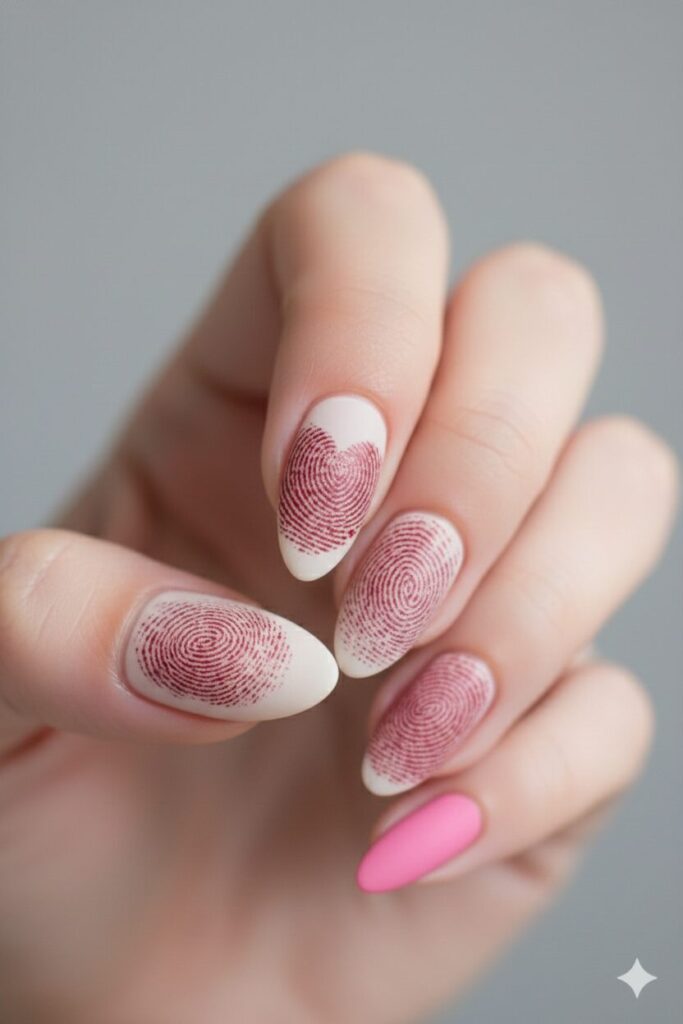
Cross your two thumbs together to make a heart shape with your prints. You can actually stamp your own fingerprint onto your nail! Paint the pad of your finger with red polish,
press it on paper once to remove excess, then press it gently on your painted nail at an angle. Do it again with the other finger to form the other half of the heart.
It puts your unique identity and texture on your nails. It is a literal personal touch that no one else can replicate.
This valentines nails art is the most unique and sentimental one you can do. It looks rustic and sweet.
21. The “Straw” Splatter
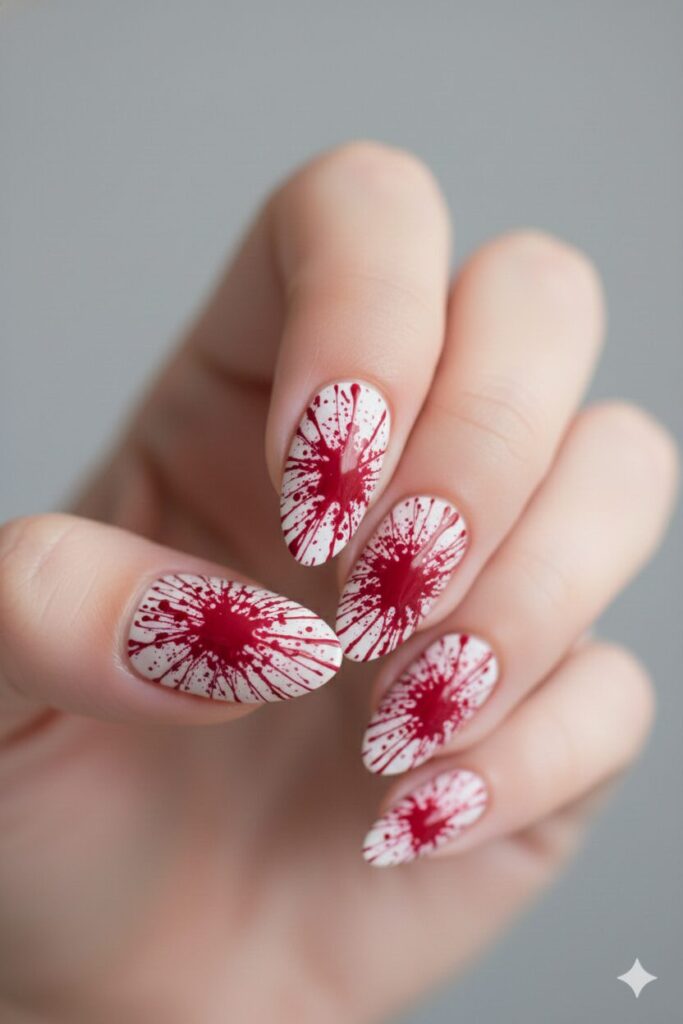
Cover the skin around your nail with tape to protect it. Dip one end of a thin plastic straw into red polish. Aim the straw at your nail and blow hard through the other end.
It creates a splatter paint effect like graffiti or an explosion of color. Do red splatter on a white background for a chaotic, artistic love look.
It is messy and super fun to do. This valentines nails art is expressive, bold, and perfect for creative souls.
Essential DIY Tips
Protect Your Skin: Before doing messy art like sponging or splattering, put tape around your finger skin or use liquid latex (or school glue) so you can peel the mess off later.
Clean Up Brush: Dip a small makeup brush in acetone to clean the edges of your nail for a salon-perfect finish.
Top Coat is King: Art looks bumpy until you add a top coat. It smooths everything out and makes it shine.
Frequently Asked Questions
Q1. What is the easiest way to do nail art for beginners?
The easiest way is to use tools you already have. For example, using a toothpick to make hearts or a bobby pin to make polka dots is much easier than using a professional brush. Designs like the “Saran Wrap Marble” or using stickers are perfect starting points for easy valentines nails art because they don’t require drawing skills.
Q2. How can I paint my non-dominant hand without making a mess?
This is the hardest part of DIY manicures! The trick is to keep your painting hand flat on a table for stability. Instead of moving the brush, try keeping the brush still and moving your finger underneath it. Also, start with the “hard” hand first (painting your dominant hand) while you still have patience.
Q3. How do I make my at-home manicure last longer?
The secret is in the “Prep” and the “Seal.” Before painting, wipe your nails with alcohol or remover to get rid of natural oils. This helps the polish stick. After you finish your easy valentines nails art, apply a high-quality top coat. Make sure to swipe the brush across the very edge (tip) of your nail to seal the color in and prevent chipping.
Q4. Do I need to buy a UV light for these designs?
No, absolutely not! All the ideas listed in this guide are designed for regular air-dry nail polish. While gel polish lasts longer, regular polish is better for easy valentines nails art beginners because it is easier to remove and fix if you make a mistake.
Q5. How can I make my nail polish dry faster?
To speed up drying, apply thin layers instead of one thick glob. Thick layers take forever to dry and smudge easily. You can also buy “Quick Dry Drops” at any drugstore in the US. One drop makes the surface dry in seconds.
Q6. Can I do these designs on short nails?
Yes! Short nails are very trendy in 2026. Designs like the “Paper Reinforcement Half-Moon,” “Gradient Sponge,” and “Thumbprint Heart” look fantastic on shorter lengths. You do not need long acrylics to enjoy beautiful easy valentines nails art.
Q7. How do I clean up the edges if I get polish on my skin?
Don’t worry if you paint outside the lines. The pro tip is to take a small, flat makeup brush (or an old eyeliner brush), dip it in nail polish remover (acetone), and gently wipe around the cuticle. This makes your DIY manicure look like you just left a salon.
Conclusion
Celebrating love doesn’t have to be complicated or expensive. With a little bit of creativity and everyday items like plastic wrap, bobby pins, and tape, you can create stunning valentines nails art right at home. It is a cozy, fun activity that makes you feel good about yourself.
Whether you choose the elegant marble look, the cute sharpie watercolor, or the fun splatter paint, your hands will look beautiful for 2026.
So, grab your polish, get comfortable, and enjoy the process of painting. Show yourself some love this season with a fresh, homemade manicure!
Happy painting and Happy Valentine’s Day!
Read More Other Post
35+ Cute Pastel Easter Nail Ideas
34+ Adorable Bunny Nail Designs
40+ Cute Daisy Nail Art Designs